Home Blog

How to validate Password Strength using Regex

Using regex to validate a password strength can be quite a handy trick where password requirements keep getting stricter. A typical scenario for a complex password in this day and age would be a password with a minimum of 8 characters, including uppercase,  lowercase and special characters. I have also added some benchmarks based on the 1080ti GPU using hashcat. Trying to identify this using a programming language may require a few if statements and may end up in a bulky password validation function or method.

The patterns mentioned below can be used in a backed application as well as a JavaScript regex password checker on the client side.

Lets start simple and see how we can create some regex patterns to validate password.

In the subsequent examples we will be using the { } (Curly Braces) to match a particular character or character class a specific number of times. ie. a{5} match the letter a 5 times, or a{5,} match the letter a a minimum of 5 times, or a{5,10} match the letter ‘a’ a minimum of 5 times and a maximum of 10 times.

Enforce characters and length allowed

Exactly 8 Character Password with lowercase letters

^[a-z]{8}$
RegEx Explanation
^ match from the start of the string
[a-z]{8} a single character in the range between a and z exactly 8 times
$ match till the end of the string

Minimum 8 and Maximum 10 Character Password with lowercase letters

^[a-z]{8,10}$
RegEx Explanation
^ match from the start of the string
[a-z]{8,10} a single character in the range between a and z 8 to 10 times
$ match till the end of the string

Minimum 8 Character Password with lowercase letters

^[a-z]{8,}$
RegEx Explanation
^ match from the start of the string
[a-z]{8,} a single character in the range between a and z 8 times or more
$ match till the end of the string

While 8 characters are required as a minimum you can accept longer input using this method.

Exactly 8 Character Password with lowercase or uppercase letters

While you can also use the ‘i’ flag with [a-z] I am going to use the expanded version in the examples below as [a-zA-Z]

^[a-zA-Z]{8}$
RegEx Explanation
^ match from the start of the string
[a-zA-Z]{8} a single character in the range between a to z, and/or A to Z, exactly 8 times
$ match till the end of the string

Minimum 8 and Maximum 10 Character Password with lowercase or uppercase letters

^[a-zA-Z]{8,10}$
RegEx Explanation
^ match from the start of the string
[a-zA-Z]{8,10} a single character in the range between a to z, and/or A to Z, 8 to 10 times
$ match till the end of the string

Minimum 8 Character Password with lowercase or uppercase letters

^[a-zA-Z]{8,}$

Exactly 8 Character Password with lowercase, uppercase letters and numbers

In the following examples you can use the meta sequence \d (which denotes numbers from 0 to 9) inside the character class in most scenarios, but for ease of understanding and compatibility I will use ‘0-9’

^[a-zA-Z0-9]{8}$

Minimum 8 and Maximum 10 Character Password with lowercase, uppercase letters and numbers

^[a-zA-Z0-9]{8,10}$

Minimum 8 Character Password with lowercase, uppercase letters and numbers

^[a-zA-Z0-9]{8,}$

8 Character Password with lowercase, uppercase or special characters

You can add the number range(ie. 0-9, adding numbers/digits) to the examples below to include numbers in them as well but I will leave that out as it would be a similar example.

^[a-zA-Z!"#\$%&'\(\)\*\+,-\.\/:;<=>\?@[\]\^_`\{\|}~]{8}$

Using shorthand:

^[a-zA-Z[:punct:]]{8}$

Minimum 8 and Maximum 10 Character Password with lowercase, uppercase or special characters

^[a-zA-Z!"#\$%&'\(\)\*\+,-\.\/:;<=>\?@[\]\^_`\{\|}~]{8,10}$

Minimum 8 Character Password with lowercase, uppercase or special characters

^[a-zA-Z!"#\$%&'\(\)\*\+,-\.\/:;<=>\?@[\]\^_`\{\|}~]{8,}$

Enforce characters restrictions and length allowed

Now lets complicate things slightly. In the examples above you can use any of the allowed characters with the real enforcement applying to the number of characters in the input.

So if lower and uppercase letters were allowed either all lowercase or all uppercase letters would be valid.

While this would be fine in most instances you may require at least one lowercase or at least one uppercase letter to be included. For this we need to use a lookahead in our pattern to determine if this character is present.

Lets look at inputs with only 8 characters allowed but for more variations, change the values inside the Curly Braces.

Exactly 8 Character Password with lowercase, uppercase letters and at least one uppercase letter

^(?=.*?[A-Z])[a-zA-Z]{8}$

In this example lowercase letters are optional.

To give you an overview of whats going on here in order to understand the subsequent examples in this section. Omitting the lookahead, we have ^[a-zA-Z]{8}$ which means allow lowercase and uppercase letters with a minimum and maximum of 8 characters.

Simple right?, so the different now is that we add (?=.?[A-Z]) to the beginning which is a positive lookahead that will scan the string from the beginning (since we use .? which is lazy) to see if there is a upper case letter that is found.

In the example above you can change (?=.[A-Z]) to (?=.[a-z]) to enforce at least one lowercase letter.

Exactly 8 Character Password with lowercase, uppercase letters, numbers and at least one lowercase letter and one uppercase letter

^(?=.*?[a-z])(?=.*?[A-Z])[a-zA-Z0-9]{8}$

Here we add (?=.?[a-z]) and (?=.?[A-Z]) to the start of the pattern following ^ which will look for at least one lowercase letter and one uppercase letter.

In this example numbers are optional and the input can contain a mix of upper and lower case letters.

Exactly 8 Character Password with lowercase, uppercase letters, numbers and at least one lowercase letter, one uppercase letter and one number

^(?=.*?[a-z])(?=.*?[A-Z])(?=.*?[0-9])[a-zA-Z0-9]{8}$

In this example none of the characters allowed [a-zA-Z0-9] are optional and atleast one of them must be used to create a 8 character string.

The use of ^(?=.?[a-z])(?=.?[A-Z])(?=.*?[0-9]) tells the regex engine to scan the string from the start and make sure that atleast one of the characters in the lookaheads exists in the string and all lookaheads are satisfied.

Exactly 10 Character Password with lowercase, uppercase letters, numbers, special characters and at least one lowercase letter, one uppercase letter, one number and one special character

^(?=.*?[a-z])(?=.*?[A-Z])(?=.*?[0-9])(?=.*?[!"#\$%&'\(\)\*\+,-\.\/:;<=>\?@[\]\^_`\{\|}~])[a-zA-Z0-9!"#\$%&'\(\)\*\+,-\.\/:;<=>\?@[\]\^_`\{\|}~]{10}$

Remember you can change the length of the input by modifying what is inside the Curly Braces at the end.

Making sure that at least one character from the accepted list is included will help to make a strong password, specially with the last example.

Exactly 8 Character input with one lowercase letter and one uppercase letter and any possible character accepted

With examples using the lookaheads above you can also have the overall character restriction open ended instead of restricting it. This would also allow for Unicode or any other possible characters except line breaks to be accepted in the validation process.

^(?=.*?[a-z])(?=.*?[A-Z]).{8}$

To point out the difference we basically used .{8} which means match any 8 characters. Again you can extend the length here by changing the parameters in the Curly Braces brackets.

Now lets look at how you can enforce particular password policies with a few examples. Remember that you can modify or extend the examples to suit your specific need.

Enforcing Specific Password Policy using Regex

Exactly 10 Character Password with lowercase, uppercase letters, and a minimum of 3 Uppercase letter

^(?=(?:[a-z]*[A-Z]){3}(?![a-z]*[A-Z]))[A-Za-z]{10}$

While we are building on the previous examples, as this is the first one of it’s kind let me try to briefly explain what is going on here.

We start at the beginning of the string and use a lookahead with two parts. The first part (?:[a-z]*[A-Z]){3} checks to see if given the entire string do we have any combinations where three uppercase characters will be among any lowercase characters in any order.

The second part (?![a-z]*[A-Z]) which is a negative lookahead, is used to do something similar but in this case we are looking to find if there is one more uppercase character and discard the string if we find it, ie the input has failed to match as we only allow 3 uppercase characters. Finally something familiar, [A-Za-z]{10} provided the previous lookahead matched, we match 10 valid characters from start to finish, and as we used ^ and $ in the pattern this will need to be the entire length of the input in order to match. Remember if you dont want to restrict what characters can be used you can also use, .{10} at the end to say after enforcing the 3 uppercase letters, the user can include any other character they want such as Unicode etc, but not a linebreak.

I also want to provide a variation to this pattern to give us a bit more flexibility with the accepted characters.

^(?=(?:[^A-Z]*[A-Z]){3}(?![^A-Z]*[A-Z]))[A-Za-z]{10}$

The difference from the previous pattern is that instead of (?:[a-z][A-Z]){3} I am using (?:[^A-Z][A-Z]){3} where [a-z] meant lower cases letters but with [^A-Z] we say anything that is not an uppercase letter. The Advantage here is that we can now control what characters are actually allowed at the very end with what goes in the square brackets ie. [A-Za-z].

Minimum 10 Character Password with lowercase, uppercase letters, digits, a minimum of 4 lowercase letters and minimum of 2 uppercase letters

^(?=(?:[^A-Z]*[A-Z]){2}(?![^A-Z]*[A-Z]))(?=(?:[^a-z]*[a-z]){4}(?![^a-z]*[a-z]))[A-Za-z0-9]{10,}$

Taking the same pattern from above and allowing any possible character beside a linebreak to be included in the string.

^(?=(?:[^A-Z]*[A-Z]){2}(?![^A-Z]*[A-Z]))(?=(?:[^a-z]*[a-z]){4}(?![^a-z]*[a-z])).{10,}$

Exactly 12 Character Password with lowercase, uppercase letters, digits, special characters, a minimum of 3 lowercase letters, minimum of 3 uppercase letters, minimum of 3 numbers and a minimum of 3 special characters

Since we have a requirement of 3 characters that are mandatory from 4 character classes, the input needs to be a minimum of 12 characters long. In the patterns below I have used {12} to set this constraint where we are making sure at least 12 characters are present. If you require a longer password simply add a range such as {12,15} for twelve to fifteen input length or {12,} for 12 or more.

^(?=(?:[^A-Z]*[A-Z]){3}(?![^A-Z]*[A-Z]))(?=(?:[^a-z]*[a-z]){3}(?![^a-z]*[a-z]))(?=(?:[^0-9]*[0-9]){3}(?![^0-9]*[0-9]))(?=(?:[^!"#\$%&'\(\)\*\+,-\.\/:;<=>\?@[\]\^_`\{\|}~]*[!"#\$%&'\(\)\*\+,-\.\/:;<=>\?@[\]\^_`\{\|}~]){3}(?![^!"#\$%&'\(\)\*\+,-\.\/:;<=>\?@[\]\^_`\{\|}~]*[!"#\$%&'\(\)\*\+,-\.\/:;<=>\?@[\]\^_`\{\|}~]))[A-Za-z0-9!"#\$%&'\(\)\*\+,-\.\/:;<=>\?@[\]\^_`\{\|}~]{12}$

Taking the same pattern from above and allowing any possible character beside a linebreak to be included in the string.

^(?=(?:[^A-Z]*[A-Z]){3}(?![^A-Z]*[A-Z]))(?=(?:[^a-z]*[a-z]){3}(?![^a-z]*[a-z]))(?=(?:[^0-9]*[0-9]){3}(?![^0-9]*[0-9]))(?=(?:[^!"#\$%&'\(\)\*\+,-\.\/:;<=>\?@[\]\^_`\{\|}~]*[!"#\$%&'\(\)\*\+,-\.\/:;<=>\?@[\]\^_`\{\|}~]){3}(?![^!"#\$%&'\(\)\*\+,-\.\/:;<=>\?@[\]\^_`\{\|}~]*[!"#\$%&'\(\)\*\+,-\.\/:;<=>\?@[\]\^_`\{\|}~])).{12}$
NVIDIA GeForce GTX 1070Ti Ethereum Mining Review

Introduction

The NVIDIA GeForce GTX 1070Ti is currently(6/9/2018) the best NVIDIA GPU to mine Ethereum simply due to it’s hashrate, power consumption and price. In this review I wanted to give an idea of the 1070Ti’s Ethereum mining performance, so that you can compare if you have already have a GTX 1070 Ti or even looking to get one.

At present(6/9/2018) the 1070ti founders edition from NVIDIA retails at $449.00 and cards can be purchased in that range depending on where you purchase it from. The TDP of the card is 180 watts but as the results will show the actual consumption under mining conditions is much less.

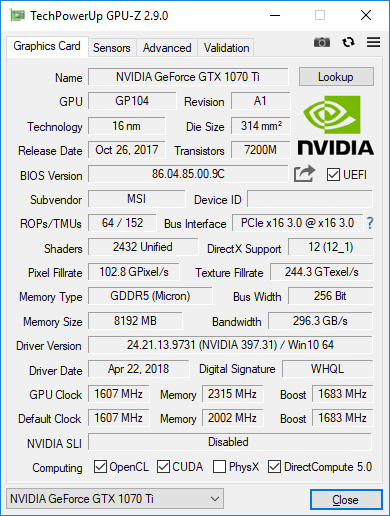
For this review I will be using a Reference Model/Founders Edition card manufactured by MSI which also uses Micron memory where the two preferred memory types for overclocking are Samsung and Micron.


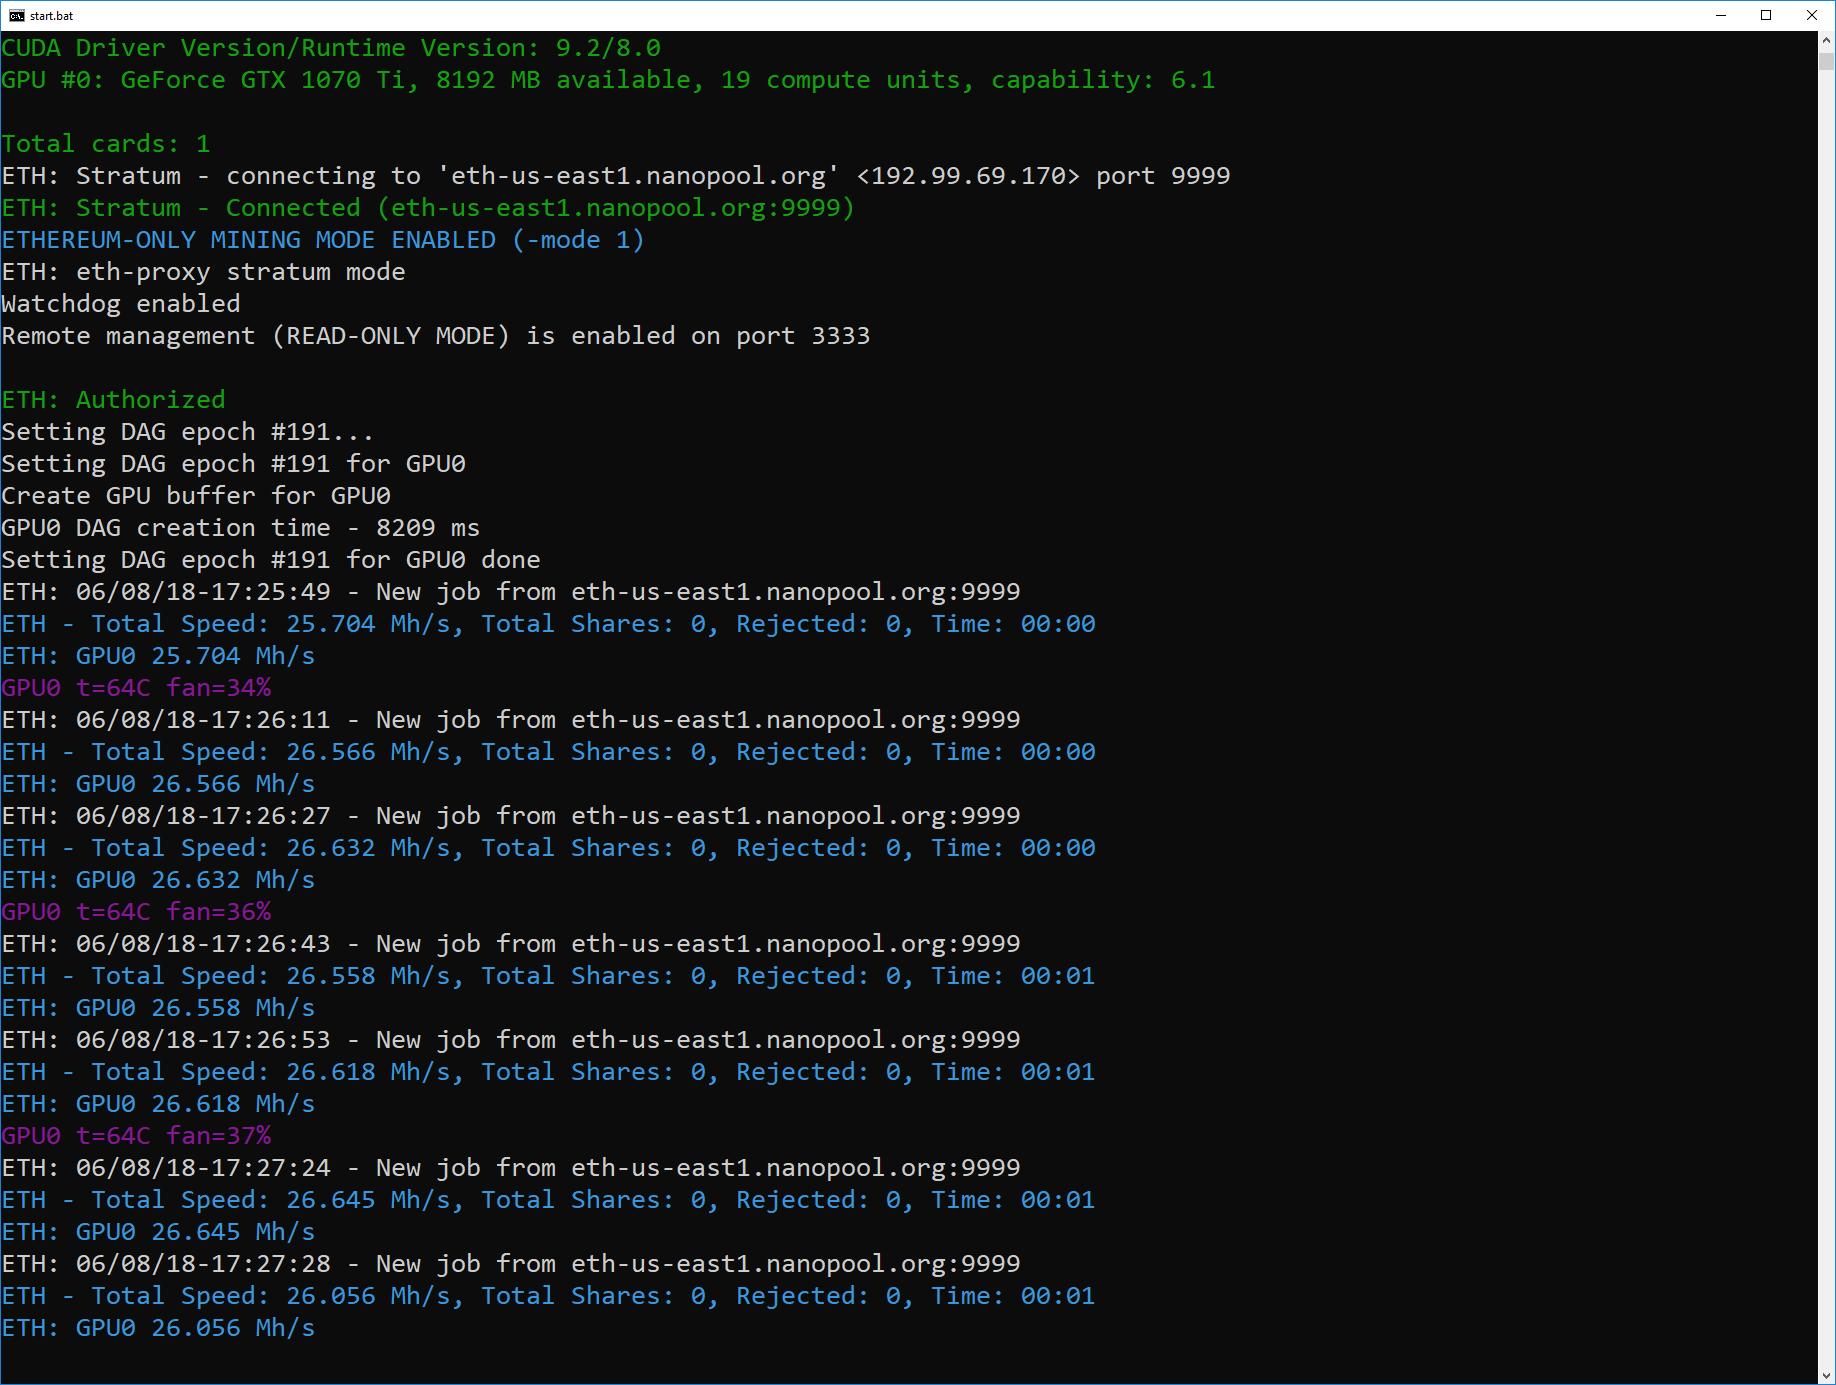
In this review I will be using the Claymore Dual Miner v10.0 in single mode only mining Ethereum, though the hashrate does not change even if dual mining.

1070ti Ethereum mining performance on default settings

Looking at the NVIDIA SMI tool while mining on default settings, the power consumption out of the box is around 135watts.

+-----------------------------------------------------------------------------+
| NVIDIA-SMI 397.31                 Driver Version: 397.31                    |
|-------------------------------+----------------------+----------------------+
| GPU  Name            TCC/WDDM | Bus-Id        Disp.A | Volatile Uncorr. ECC |
| Fan  Temp  Perf  Pwr:Usage/Cap|         Memory-Usage | GPU-Util  Compute M. |
|===============================+======================+======================|
|   0  GeForce GTX 107... WDDM  | 00000000:01:00.0  On |                  N/A |
| 36%   64C    P2   135W / 180W |   3420MiB /  8192MiB |    100%      Default |
+-------------------------------+----------------------+----------------------+


The cards performance for the price is fantastic at an average of 26 Mh/s and also maintain a temperature of 64C(147.2F) while consuming only 135 watts.

Now lets look at how we can improve our situation.

1070ti Overclocked Ethereum mining performance

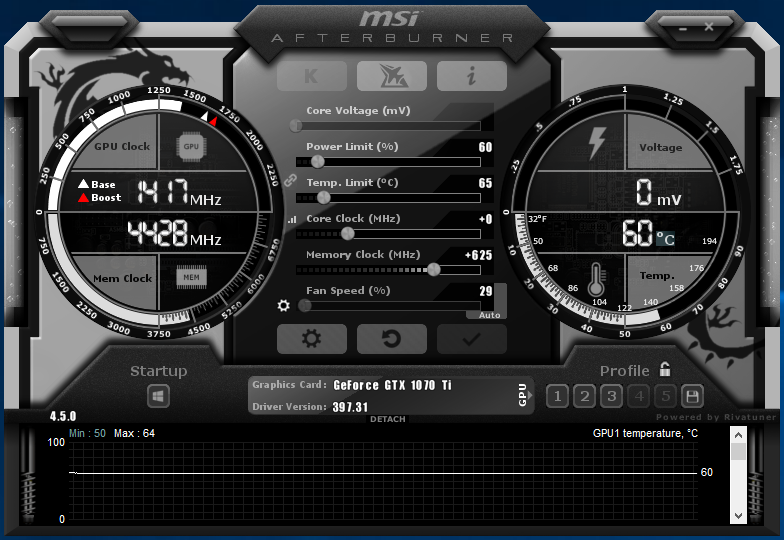
The overclocking settings we have found to be the best with this card are:

  • Power Limit: 60
  • Temp Limit: 65 Celsius (149F)
  • Memory Clock: 625

( your settings can change depending on the memory type, manufacturer and card design )


The SMI tool showing the power reduction to 108 watts and GPU temp around 61C.

+-----------------------------------------------------------------------------+
| NVIDIA-SMI 397.31                 Driver Version: 397.31                    |
|-------------------------------+----------------------+----------------------+
| GPU  Name            TCC/WDDM | Bus-Id        Disp.A | Volatile Uncorr. ECC |
| Fan  Temp  Perf  Pwr:Usage/Cap|         Memory-Usage | GPU-Util  Compute M. |
|===============================+======================+======================|
|   0  GeForce GTX 107... WDDM  | 00000000:01:00.0  On |                  N/A |
|  0%   61C    P2   108W / 108W |   3408MiB /  8192MiB |    100%      Default |
+-------------------------------+----------------------+----------------------+


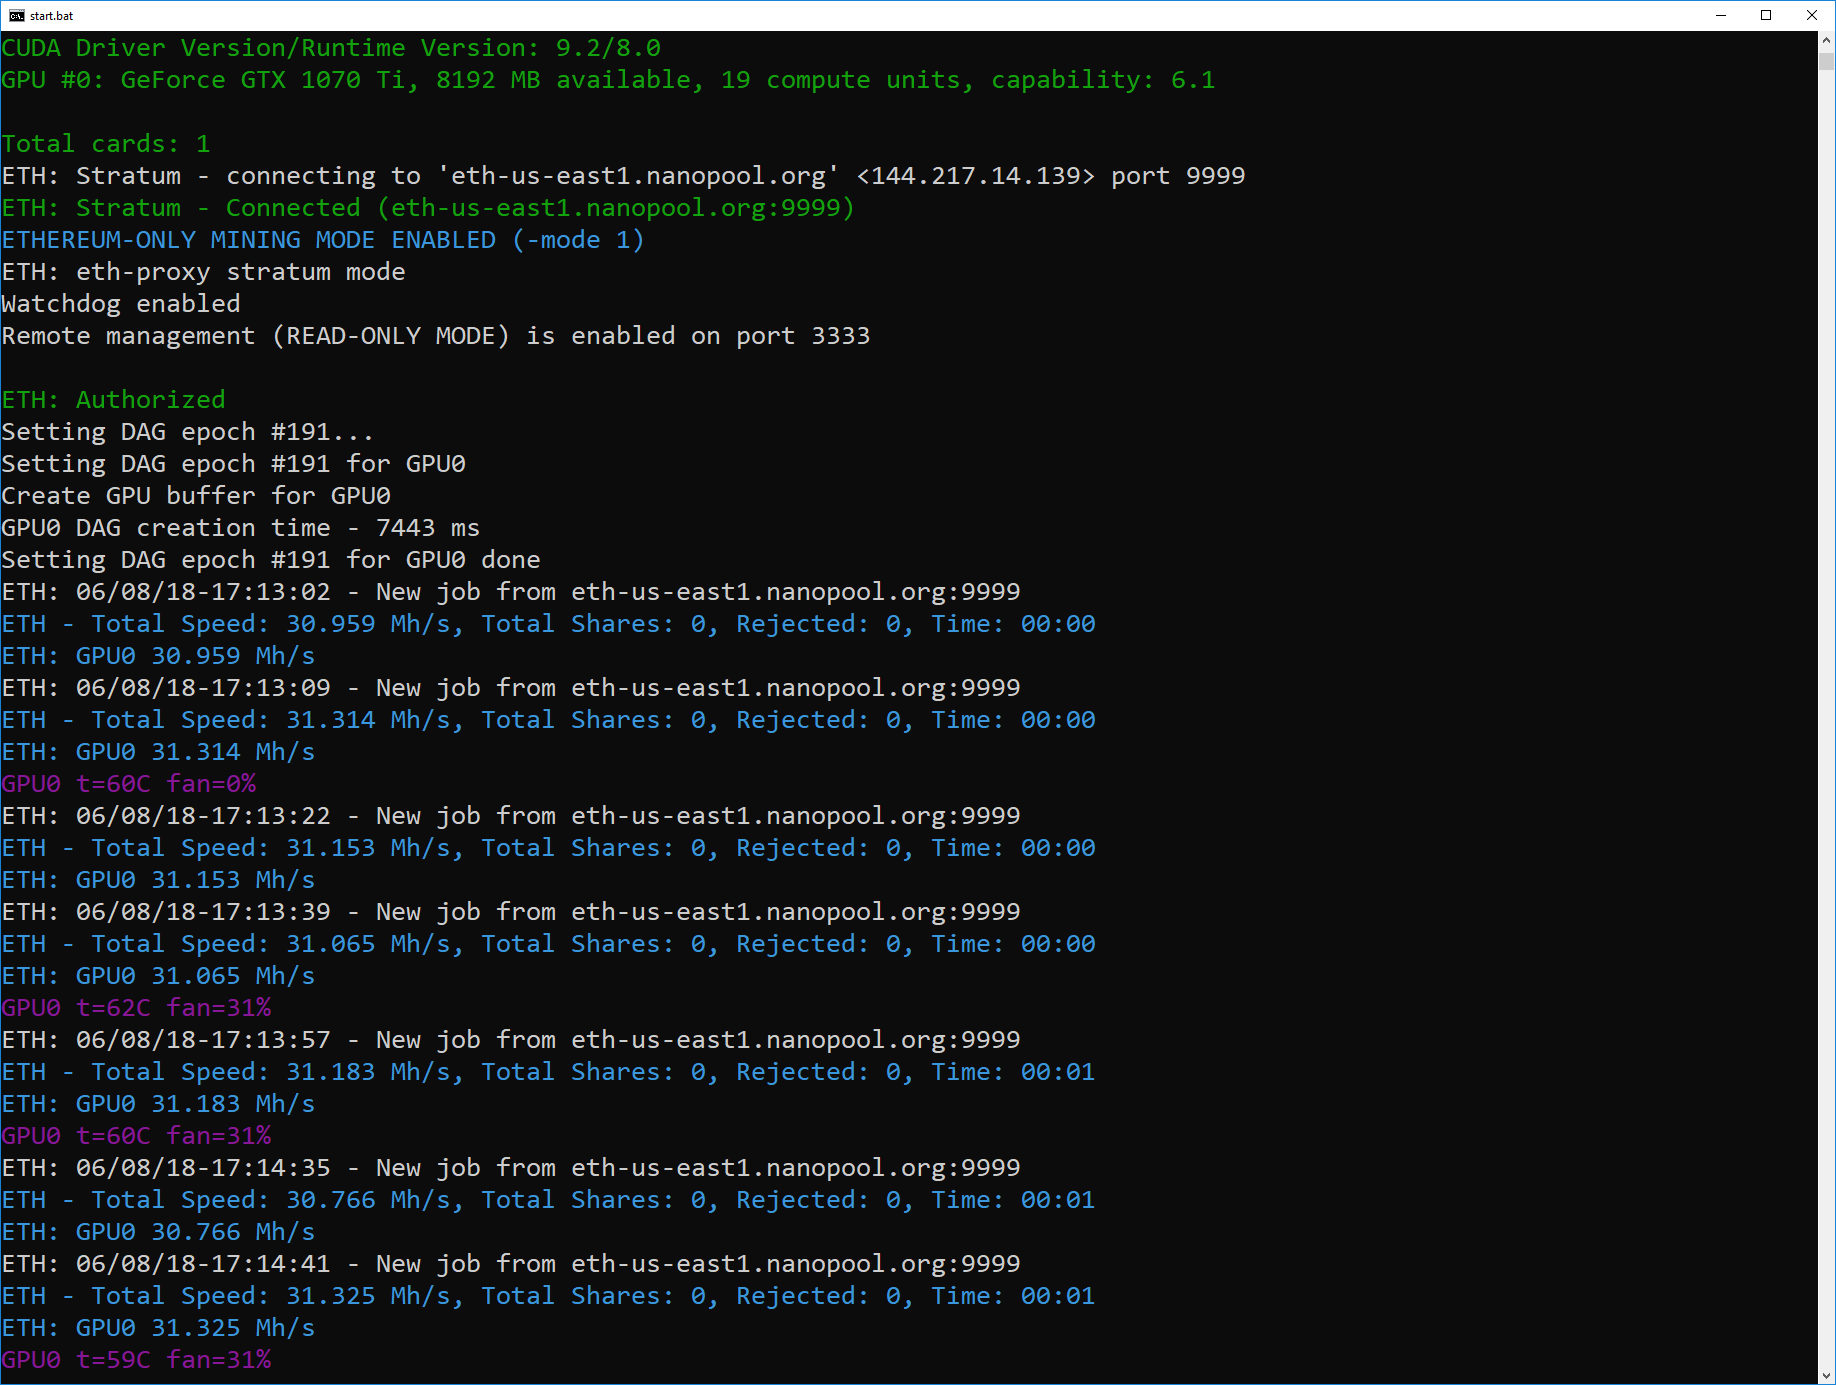
With a 60% power limit we reduce the power consumption to 108watts and are able to achieve an average of 31 Mh/s while the card remains cool with no software fan monitoring turned on at just 60C(140F).


1070ti OhGodAnETHlargementPill Ethereum Mining

At present(6/9/2018) the OhGodAnETHlargementPill does not support the 1070ti. The 1070ti uses GDDR5 memory and the free version of OhGodAnETHlargementPill only supports GDDRX5 memory which was implemented in the 1080 and up.

There is a paid version of the tool which does work with the 1070ti and older GeForce cards but you will need to contact the author Kristy-Leigh Minehan to get pricing information.

Conclusion

The NVIDIA 1070 Ti is one of the top contenders for Etheruem mining. Based on its hashrate, power consumption and price a nice balance is struck between cost effectiveness of the card, running costs of electricity and deliverable in terms of hash rate.

Average Mining Performance

Default: 26 Mh/s

Overclocked: 31 Mh/s

Introduction

The NVIDIA GeForce GTX 1070Ti is currently(6/9/2018) the best NVIDIA GPU to mine Ethereum simply due to it’s hashrate, power consumption and price. In this review I wanted to give an idea of the 1070Ti’s Ethereum mining performance, so that you can compare if you have already have a GTX 1070 Ti or even looking to get one.

At present(6/9/2018) the 1070ti founders edition from NVIDIA retails at $449.00 and cards can be purchased in that range depending on where you purchase it from. The TDP of the card is 180 watts but as the results will show the actual consumption under mining conditions is much less.

For this review I will be using a Reference Model/Founders Edition card manufactured by MSI which also uses Micron memory where the two preferred memory types for overclocking are Samsung and Micron.

In this review I will be using the Claymore Dual Miner v10.0 in single mode only mining Ethereum, though the hashrate does not change even if dual mining. ## 1070ti Ethereum mining performance on default settings

Looking at the NVIDIA SMI tool while mining on default settings, the power consumption out of the box is around 135watts.

+-----------------------------------------------------------------------------+
| NVIDIA-SMI 397.31                 Driver Version: 397.31                    |
|-------------------------------+----------------------+----------------------+
| GPU  Name            TCC/WDDM | Bus-Id        Disp.A | Volatile Uncorr. ECC |
| Fan  Temp  Perf  Pwr:Usage/Cap|         Memory-Usage | GPU-Util  Compute M. |
|===============================+======================+======================|
|   0  GeForce GTX 107... WDDM  | 00000000:01:00.0  On |                  N/A |
| 36%   64C    P2   135W / 180W |   3420MiB /  8192MiB |    100%      Default |
+-------------------------------+----------------------+----------------------+

The cards performance for the price is fantastic at an average of 26 Mh/s and also maintain a temperature of 64C(147.2F) while consuming only 135 watts. Now lets look at how we can improve our situation. ## 1070ti Overclocked Ethereum mining performance

The overclocking settings we have found to be the best with this card are: – Power Limit: 60

  • Temp Limit: 65 Celsius (149F)
  • Memory Clock: 625

( your settings can change depending on the memory type, manufacturer and card design ) The SMI tool showing the power reduction to 108 watts and GPU temp around 61C.

+-----------------------------------------------------------------------------+
| NVIDIA-SMI 397.31                 Driver Version: 397.31                    |
|-------------------------------+----------------------+----------------------+
| GPU  Name            TCC/WDDM | Bus-Id        Disp.A | Volatile Uncorr. ECC |
| Fan  Temp  Perf  Pwr:Usage/Cap|         Memory-Usage | GPU-Util  Compute M. |
|===============================+======================+======================|
|   0  GeForce GTX 107... WDDM  | 00000000:01:00.0  On |                  N/A |
|  0%   61C    P2   108W / 108W |   3408MiB /  8192MiB |    100%      Default |
+-------------------------------+----------------------+----------------------+

With a 60% power limit we reduce the power consumption to 108watts and are able to achieve an average of 31 Mh/s while the card remains cool with no software fan monitoring turned on at just 60C(140F).

1070ti OhGodAnETHlargementPill Ethereum Mining

At present(6/9/2018) the OhGodAnETHlargementPill does not support the 1070ti. The 1070ti uses GDDR5 memory and the free version of OhGodAnETHlargementPill only supports GDDRX5 memory which was implemented in the 1080 and up. There is a paid version of the tool which does work with the 1070ti and older GeForce cards but you will need to contact the author Kristy-Leigh Minehan to get pricing information. ## Conclusion

The NVIDIA 1070 Ti is one of the top contenders for Etheruem mining. Based on its hashrate, power consumption and price a nice balance is struck between cost effectiveness of the card, running costs of electricity and deliverable in terms of hash rate. ### Average Mining Performance

Default: 26 Mh/s Overclocked: 31 Mh/s

How to Export and Import Putty Settings

0

Introduction

If you are a Windows user who constantly has to work with Linux systems in a CLI environment you probably are already using Putty by Simon Tatham in order to make your SSH connections. If you are not using putty yet, use this link to download putty.

While it may not be common to have putty running on more than one workstation, if you do use more than one, exporting and importing putty settings or sessions specially if you have quite a bit, could be a time saver to get up and running quickly. If not it is also a good way to simply export and have a backup of just your putty sessions or settings as a whole.

While the latest release as of the time of this post (Putty 0.70) does not have a built in method to import or export sessions or settings, putty does store its data in the Windows registry. So provided you have the correct access on the machine you can use the Windows registry to accomplish this task.

Putty stores its setting under the Windows Registry Key below, so lets look at how we can access this data.

HKEY_CURRENT_USER\Software\SimonTatham

Exporting Putty Settings from the Windows Registry

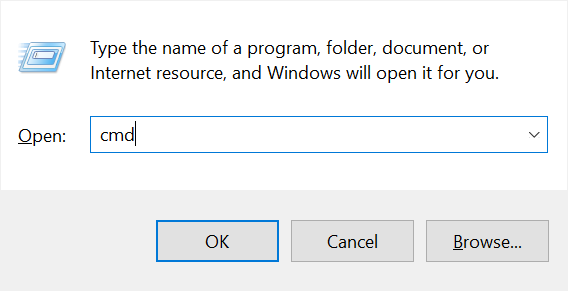
Open a command prompt by using the Windows Key+R on your keyboard, type ‘cmd’ and press ‘OK’ to open the windows command prompt.

The regedit command below with the parameter /E, file name and key path tells regedit to export the specific information in the key to the file we specify. In this instance the file putty-settings.reg will be created in the current users Windows Documents directory. You can specify a different path and filename that you prefer if you like.

regedit /E "%USERPROFILE%\Documents\putty-settings.reg" HKEY_CURRENT_USER\Software\SimonTatham

Importing Putty Settings

To import putty settings you will need to merge the registry file that was created in the previous step. Find the file from the location you saved it at, in our example it was in the current users Documents folder, right click the file and select Merge and in dialog that appears you can select ‘Yes’. You can also double click on the run to run/merge it.

Exporting Putty Sessions from the Windows Registry

If you want to only export your Putty Sessions, the method is similar to exporting settings with the difference being that the registry key use is

HKEY_CURRENT_USER\Software\SimonTatham\PuTTY\Sessions

And the windows command to execute will be something similar to this where you can change the path and filename of the created file you prefer:

regedit /E "%USERPROFILE%\Documents\putty-sessions.reg" HKEY_CURRENT_USER\Software\SimonTatham\PuTTY\Sessions

The command above will create a registry export file with only your Putty Sessions.

Importing Putty Sessions

To import the putty sessions to your new putty installation, simply find the file export file your had created previous and merge the settings as explains in the Import Putty Settings previously.

Installing VirtualBox Guest Additions on Ubuntu

If you are using Ubuntu on a virtual machine created with Oracle VirtualBox, one of the very first things you would want to do right after installing the OS is to install the VirtualBox Guest Additions.

“Guest Additions” provides features that will help with improving the guest operating system as well as with the guest interacting with the host operating system.

Some of the features VirtualBox Guest Additions provides are:

  • Mouse pointer integration
  • Shared folders
  • Better video support
  • Seamless windows
  • Generic host/guest communication channels
  • Time synchronization
  • Shared clipboard
  • Automated logons

You can find more detailed information at Guest Additions Introduction.

In the example created I am running Ubuntu Desktop 18.04 LTS on a Microsoft Windows 10 Host with VirtualBox version 5.2.12. So lets get started…

First… Grab the Latest VirtualBox

I cannot stress how important this step is so before you begin make sure you visit the VirtualBox Download page and install the latest application version for your host.

Installing VirtualBox Guest Additions on Ubuntu Desktop 18.04

Once the Ubuntu installation is complete, open a terminal window and run the command below to install the Linux headers for your kernel, build-essential and DKMS (Dynamic Kernel Module Support) .

sudo apt install linux-headers-$(uname -r) build-essential dkms

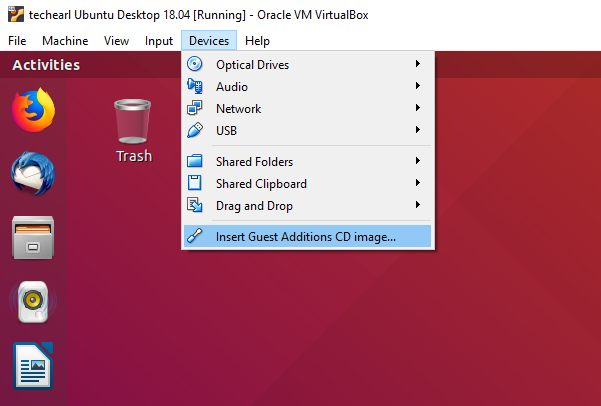
Once you have installed the above requirements, the Devices menu in your virtual machine and select “Insert Guest Additions CD Image…” as shown in the image below.

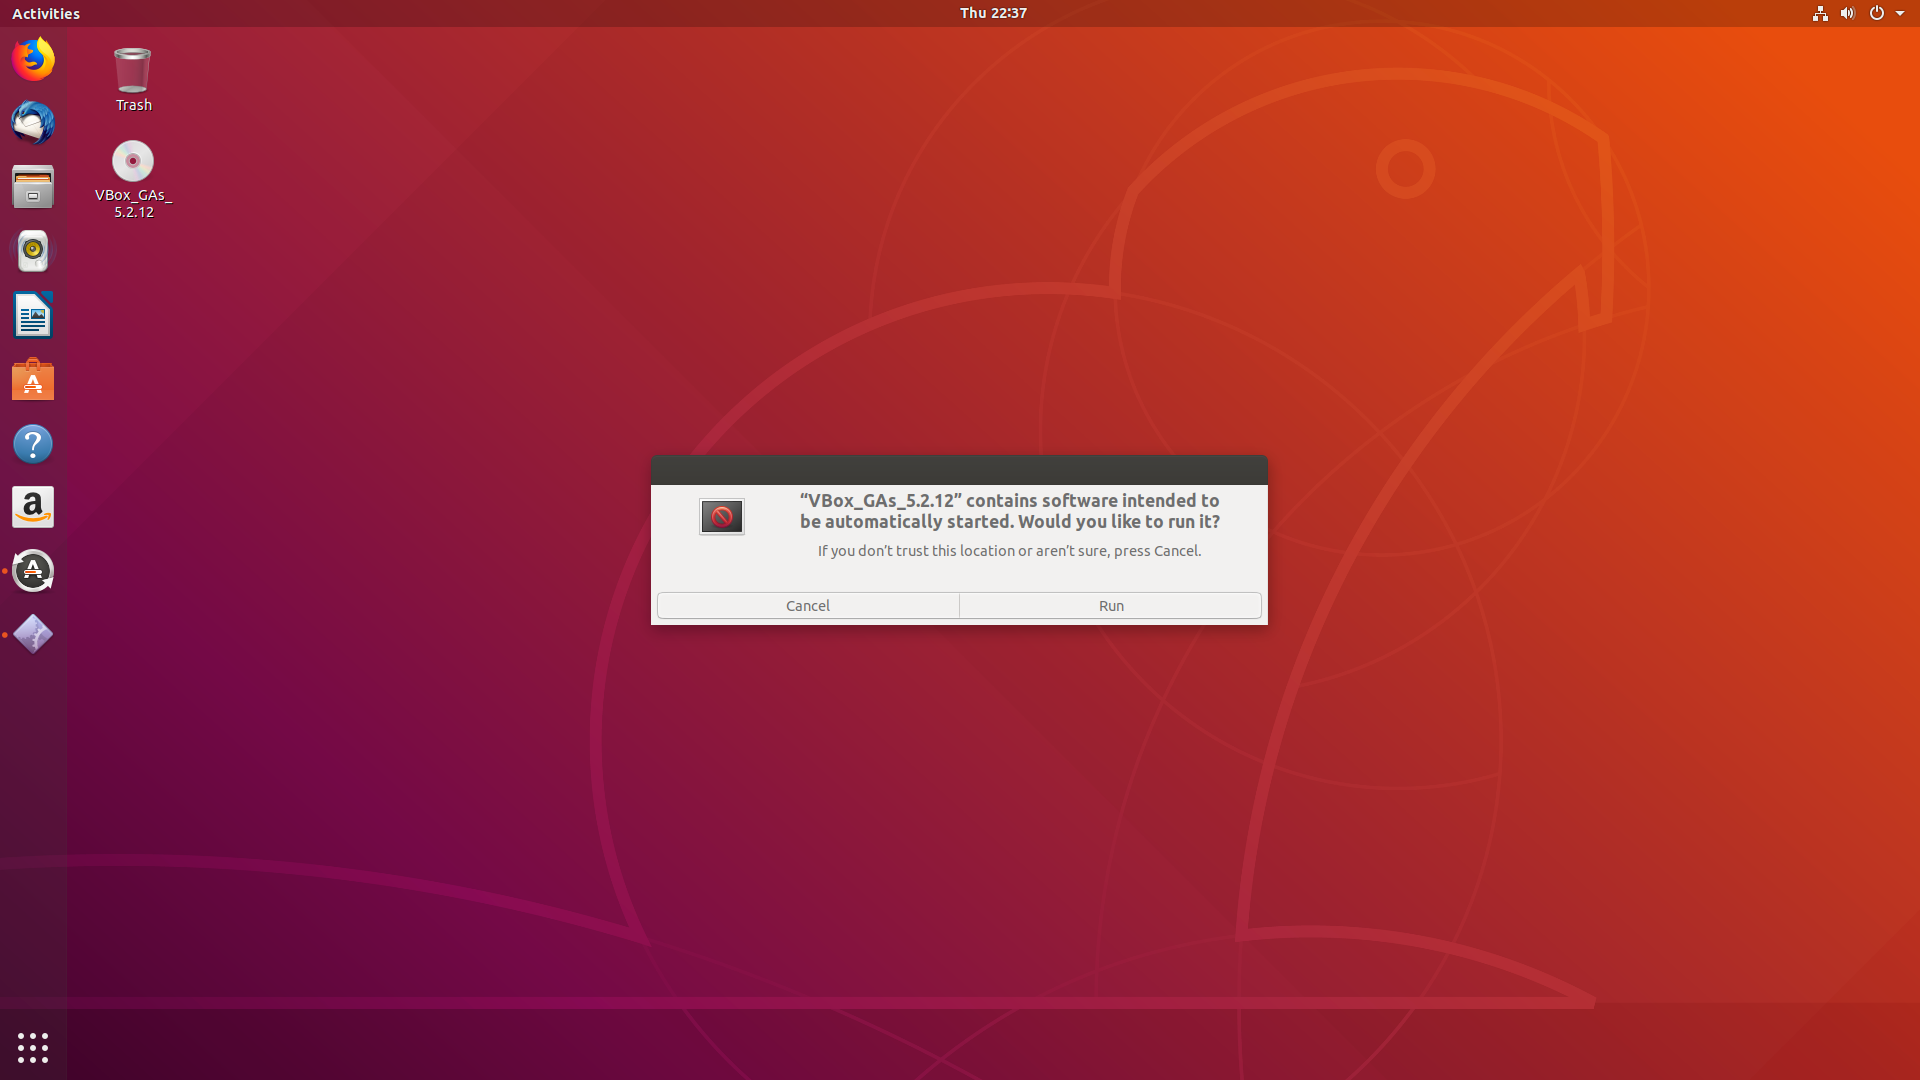
This should mount the guest additions automatically and you should see the mounted drive (VBOX_GAs_x.x.x) show up on your desktop similar to the image below. You may also be presented with the option to run the CD, click Run to execute the installation script.

If you had not run the command mentioned previously to install the required packages as mentioned above, the result window will look similar to the image below and also have the following warning. If that is the case install the requirements using the command from above and run the software on the CD again.

Verifying archive integrity... All good.
Uncompressing VirtualBox 5.2.12 Guest Additions for Linux........
VirtualBox Guest Additions installer
Copying additional installer modules ...
Installing additional modules ...
VirtualBox Guest Additions: Building the VirtualBox Guest Additions kernel modules.
This system is currently not set up to build kernel modules.
Please install the gcc make perl packages from your distribution.
VirtualBox Guest Additions: Running kernel modules will not be replaced until the system is restarted
VirtualBox Guest Additions: Starting.
Press Return to close this window...

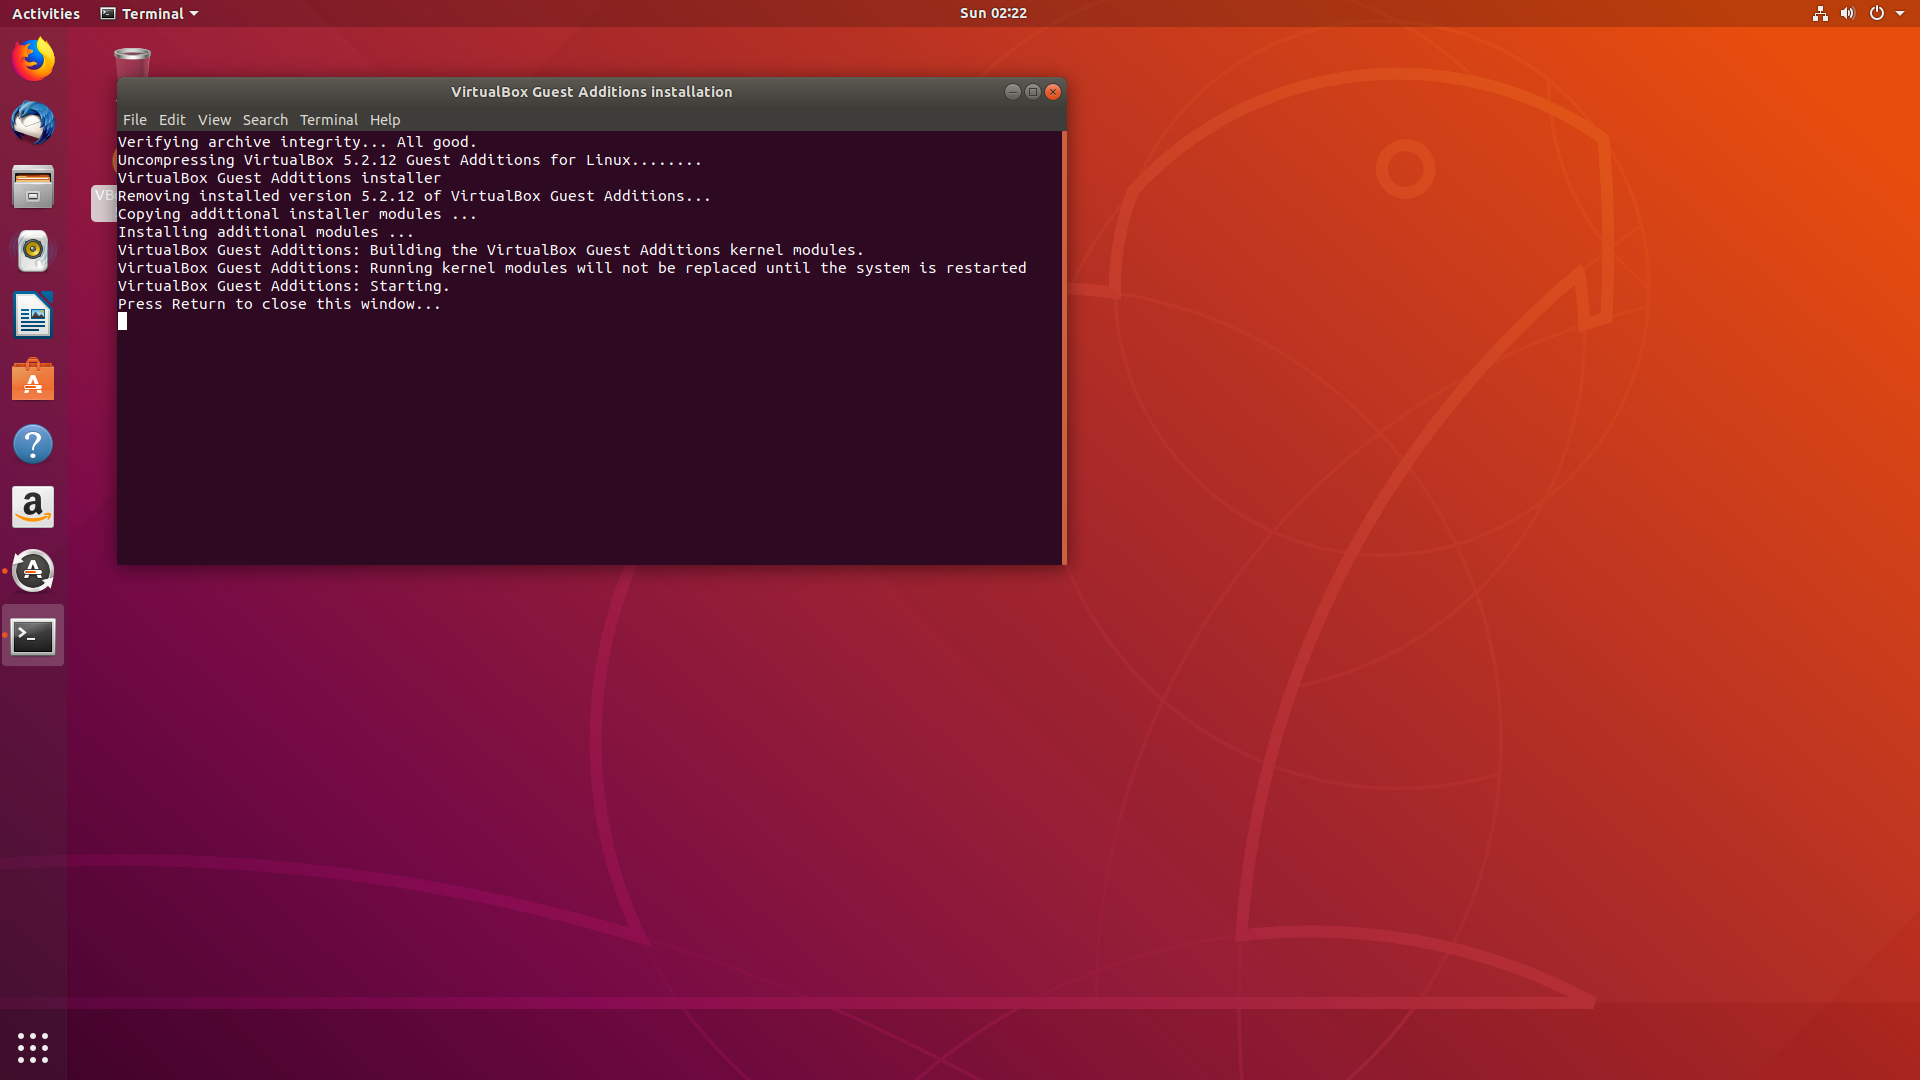
If everything worked out and the installation was successful the resulting screen should look similar to the one below.

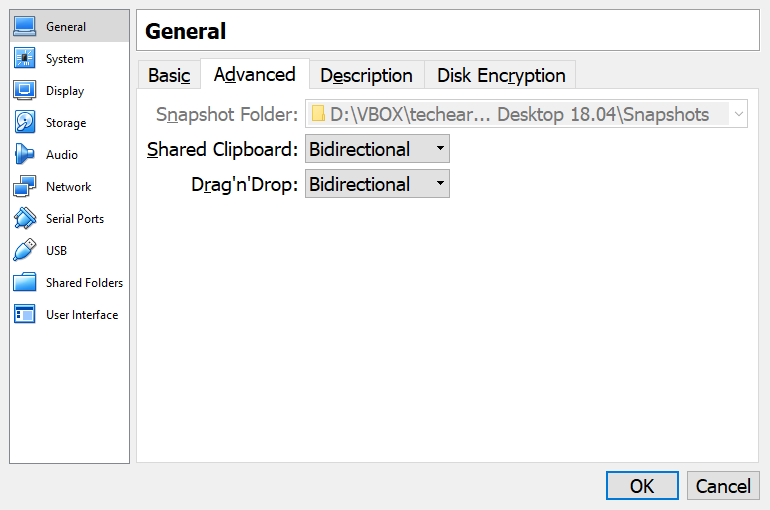
At this point you can check your Shared Clipboard and Drag’n’Drop settings by going the VM settings, General -> Advanced and set it to your preference, I have both set to Bidirectional as shown in the example below.

Press ok to save and reboot the virtual machine. Once the machine has come back up, you can perform a simple test by opening the text editor and pasting some text copied from the host machine.

You should now be able to experience the ubuntu guest in a more pleasing manner.

Hashcat Benchmarks NVIDIA GEFORCE GTX 1080 Ti

0

I wanted to post some benchmark results for the GTX 1080 Ti with hashcat version 4.0.1 as it has some newer hashtypes included.

The test is performed on Windows 10 Professional, running on an AMD Ryzen Threadripper 1950x with 64GB of RAM using 1x NVIDIA GEFORCE GTX 1080Ti Founders Edition(FE) GPU.

The Founders Edition or Reference card is particularly suited for this task if your GPU(s) is/are in an enclosed CPU case as the cooling system on the reference cards use a Blower type fan and will move the hot air out of the case. Of course if you use liquid cooling, have good ventilation within your case or have your cards sitting outside this would not really matter too much.

Adding a disclaimer though the results you will see below are done in optimal conditions in cracking one hash. These speeds would start to decrease as the number of hashes you are simultaneously cracking increases.

hashcat (v4.0.1) starting in benchmark mode...

OpenCL Platform #1: NVIDIA Corporation
======================================
* Device #1: GeForce GTX 1080 Ti, 2816/11264 MB allocatable, 28MCU

Started: Thu Jan 25 18:43:07 2018
                                  
Stopped: Thu Jan 25 19:08:29 2018
Hash Mode – Type Hash Rate
900 – MD4 60834.7 MH/s
0 – MD5 34026.4 MH/s
5100 – Half MD5 21255.7 MH/s
100 – SHA1 11402.8 MH/s
1400 – SHA-256 4300.1 MH/s
10800 – SHA-384 1255.9 MH/s
1700 – SHA-512 1272.1 MH/s
5000 – SHA-3 (Keccak) 1122.4 MH/s
10100 – SipHash 40097.7 MH/s
14900 – Skip32 (PT = $salt, key = $pass) 6758.6 MH/s
6000 – RIPEMD-160 6676.2 MH/s
6100 – Whirlpool 295.6 MH/s
6900 – GOST R 34.11-94 345.5 MH/s
11700 – GOST R 34.11-2012 (Streebog) 256-bit 64046.5 kH/s
11800 – GOST R 34.11-2012 (Streebog) 512-bit 63941.8 kH/s
14000 – DES (PT = $salt, key = $pass) 24734.1 MH/s
14100 – 3DES (PT = $salt, key = $pass) 1634.5 MH/s
400 – phpass, WordPress (MD5), phpBB3 (MD5), Joomla (MD5) 9287.8 kH/s
8900 – scrypt 577.0 kH/s
11900 – PBKDF2-HMAC-MD5 10127.8 kH/s
12000 – PBKDF2-HMAC-SHA1 4286.6 kH/s
10900 – PBKDF2-HMAC-SHA256 1471.9 kH/s
12100 – PBKDF2-HMAC-SHA512 477.7 kH/s
23 – Skype 17812.1 MH/s
2500 – WPA/WPA2 533.6 kH/s
2501 – WPA/WPA2 PMK 179.8 MH/s
5300 – IKE-PSK MD5 2489.9 MH/s
5400 – IKE-PSK SHA1 924.3 MH/s
5500 – NetNTLMv1 / NetNTLMv1+ESS 29492.8 MH/s
5600 – NetNTLMv2 2269.9 MH/s
7300 – IPMI2 RAKP HMAC-SHA1 1946.3 MH/s
7500 – Kerberos 5 AS-REQ Pre-Auth etype 23 410.1 MH/s
13100 – Kerberos 5 TGS-REP etype 23 407.4 MH/s
8300 – DNSSEC (NSEC3) 4301.8 MH/s
11100 – PostgreSQL CRAM (MD5) 8829.9 MH/s
11200 – MySQL CRAM (SHA1) 2954.9 MH/s
11400 – SIP digest authentication (MD5) 4287.8 MH/s
121 – SMF (Simple Machines Forum) > v1.1 8868.1 MH/s
2611 – vBulletin < v3.8.5 9241.6 MH/s
2711 – vBulletin >= v3.8.5 6247.4 MH/s
2811 – IPB2+ (Invision Power Board), MyBB 1.2+ 6697.2 MH/s
8400 – WBB3 (Woltlab Burning Board) 1527.1 MH/s
13900 – OpenCart 2645.7 MH/s
11 – Joomla < 2.5.18 33238.1 MH/s
2612 – PHPS 8988.0 MH/s
7900 – Drupal7 69900 H/s
21 – osCommerce, xt:Commerce 17337.4 MH/s
11000 – PrestaShop 11073.4 MH/s
124 – Django (SHA-1) 8866.1 MH/s
10000 – Django (PBKDF2-SHA256) 74382 H/s
3711 – MediaWiki B type 8396.9 MH/s
4521 – Redmine 3912.2 MH/s
4522 – PunBB 3886.9 MH/s
12 – PostgreSQL 33132.4 MH/s
131 – MSSQL (2000) 11382.1 MH/s
132 – MSSQL (2005) 11375.4 MH/s
1731 – MSSQL (2012, 2014) 1223.9 MH/s
200 – MySQL323 69043.4 MH/s
300 – MySQL4.1/MySQL5 4897.4 MH/s
3100 – Oracle H: Type (Oracle 7+) 1270.6 MH/s
112 – Oracle S: Type (Oracle 11+) 11080.0 MH/s
12300 – Oracle T: Type (Oracle 12+) 111.3 kH/s
8000 – Sybase ASE 419.2 MH/s
141 – Episerver 6.x < .NET 4 8853.5 MH/s
1441 – Episerver 6.x >= .NET 4 3638.1 MH/s
1600 – Apache $apr1$ MD5, md5apr1, MD5 (APR) 13753.3 kH/s
12600 – ColdFusion 10+ 2353.2 MH/s
1421 – hMailServer 3634.4 MH/s
101 – nsldap, SHA-1(Base64), Netscape LDAP SHA 11144.5 MH/s
111 – nsldaps, SSHA-1(Base64), Netscape LDAP SSHA 11162.7 MH/s
1411 – SSHA-256(Base64), LDAP {SSHA256} 4216.2 MH/s
1711 – SSHA-512(Base64), LDAP {SSHA512} 1241.1 MH/s
3000 – LM 22639.3 MH/s
1000 – NTLM 56636.3 MH/s
1100 – Domain Cached Credentials (DCC), MS Cache 14824.1 MH/s
2100 – Domain Cached Credentials 2 (DCC2), MS Cache 2 434.4 kH/s
15300 – DPAPI masterkey file v1 90252 H/s
15900 – DPAPI masterkey file v2 57086 H/s
12800 – MS-AzureSync PBKDF2-HMAC-SHA256 11703.7 kH/s
1500 – descrypt, DES (Unix), Traditional DES 1292.7 MH/s
12400 – BSDi Crypt, Extended DES 2218.4 kH/s
500 – md5crypt, MD5 (Unix), Cisco-IOS $1$ (MD5) 13711.0 kH/s
3200 – bcrypt $2*$, Blowfish (Unix) 19571 H/s
7400 – sha256crypt $5$, SHA256 (Unix) 529.7 kH/s
1800 – sha512crypt $6$, SHA512 (Unix) 201.2 kH/s
122 – macOS v10.4, macOS v10.5, MacOS v10.6 8868.8 MH/s
1722 – macOS v10.7 1208.7 MH/s
7100 – macOS v10.8+ (PBKDF2-SHA512) 13737 H/s
6300 – AIX {smd5} 13717.1 kH/s
6700 – AIX {ssha1} 53183.5 kH/s
6400 – AIX {ssha256} 21835.8 kH/s
6500 – AIX {ssha512} 6442.8 kH/s
2400 – Cisco-PIX MD5 22345.1 MH/s
2410 – Cisco-ASA MD5 24184.7 MH/s
5700 – Cisco-IOS type 4 (SHA256) 4212.9 MH/s
9200 – Cisco-IOS $8$ (PBKDF2-SHA256) 74908 H/s
9300 – Cisco-IOS $9$ (scrypt) 29973 H/s
22 – Juniper NetScreen/SSG (ScreenOS) 17701.8 MH/s
501 – Juniper IVE 13802.5 kH/s
5800 – Samsung Android Password/PIN 7423.9 kH/s
8100 – Citrix NetScaler 9460.3 MH/s
8500 – RACF 3606.9 MH/s
7200 – GRUB 2 48184 H/s
9900 – Radmin2 11380.6 MH/s
7700 – SAP CODVN B (BCODE) 1778.9 MH/s
7800 – SAP CODVN F/G (PASSCODE) 1144.4 MH/s
10300 – SAP CODVN H (PWDSALTEDHASH) iSSHA-1 7564.5 kH/s
8600 – Lotus Notes/Domino 5 307.2 MH/s
8700 – Lotus Notes/Domino 6 101.3 MH/s
9100 – Lotus Notes/Domino 8 877.8 kH/s
133 – PeopleSoft 11392.6 MH/s
13500 – PeopleSoft PS_TOKEN 4071.9 MH/s
11600 – 7-Zip 10506 H/s
13600 – WinZip 1422.9 kH/s
12500 – RAR3-hp 39246 H/s
13000 – RAR5 45544 H/s
13200 – AxCrypt 163.3 kH/s
13300 – AxCrypt in-memory SHA1 10495.2 MH/s
6211 – TrueCrypt PBKDF2-HMAC-RIPEMD160 + XTS 512 bit 372.1 kH/s
6221 – TrueCrypt PBKDF2-HMAC-SHA512 + XTS 512 bit 443.5 kH/s
6231 – TrueCrypt PBKDF2-HMAC-Whirlpool + XTS 512 bit 48103 H/s
6241 – TrueCrypt PBKDF2-HMAC-RIPEMD160 + XTS 512 bit + boot-mode 691.2 kH/s
13711 – VeraCrypt PBKDF2-HMAC-RIPEMD160 + XTS 512 bit 1208 H/s
13721 – VeraCrypt PBKDF2-HMAC-SHA512 + XTS 512 bit 965 H/s
13731 – VeraCrypt PBKDF2-HMAC-Whirlpool + XTS 512 bit 93 H/s
13741 – VeraCrypt PBKDF2-HMAC-RIPEMD160 + XTS 512 bit + boot-mode 2404 H/s
13751 – VeraCrypt PBKDF2-HMAC-SHA256 + XTS 512 bit 1396 H/s
13761 – VeraCrypt PBKDF2-HMAC-SHA256 + XTS 512 bit + boot-mode 3520 H/s
8800 – Android FDE <= 4.3 1070.4 kH/s
12900 – Android FDE (Samsung DEK) 364.1 kH/s
12200 – eCryptfs 17796 H/s
9700 – MS Office <= 2003 $0/$1, MD5 + RC4 361.7 MH/s
9710 – MS Office <= 2003 $0/$1, MD5 + RC4, collider #1 450.6 MH/s
9800 – MS Office <= 2003 $3/$4, SHA1 + RC4 433.0 MH/s
9810 – MS Office <= 2003 $3, SHA1 + RC4, collider #1 483.5 MH/s
9400 – MS Office 2007 181.2 kH/s
9500 – MS Office 2010 90840 H/s
9600 – MS Office 2013 11739 H/s
10400 – PDF 1.1 – 1.3 (Acrobat 2 – 4) 493.2 MH/s
10410 – PDF 1.1 – 1.3 (Acrobat 2 – 4), collider #1 543.7 MH/s
10500 – PDF 1.4 – 1.6 (Acrobat 5 – 8) 23007.8 kH/s
10600 – PDF 1.7 Level 3 (Acrobat 9) 4237.8 MH/s
10700 – PDF 1.7 Level 8 (Acrobat 10 – 11) 43772 H/s
9000 – Password Safe v2 454.4 kH/s
5200 – Password Safe v3 1670.0 kH/s
6800 – LastPass + LastPass sniffed 3040.1 kH/s
6600 – 1Password, agilekeychain 4223.6 kH/s
8200 – 1Password, cloudkeychain 11506 H/s
11300 – Bitcoin/Litecoin wallet.dat 5846 H/s
12700 – Blockchain, My Wallet 65134.5 kH/s
15200 – Blockchain, My Wallet, V2 433.2 kH/s
13400 – KeePass 1 (AES/Twofish) and KeePass 2 (AES) 190.5 kH/s
15500 – JKS Java Key Store Private Keys (SHA1) 10714.6 MH/s
15600 – Ethereum Wallet, PBKDF2-HMAC-SHA256 5692 H/s
125 – ArubaOS 8888.8 MH/s
15400 – ChaCha20 5905.7 MH/s

WordPress: Sending HTML formatted emails using the wp_mail() function

7

If you are working on sending emails from your plugin or theme in WordPress it is a very good idea to use the wp_mail() function instead of trying to directly do it with PHP or other means. The reason for this is that the function provides filters for controlling the email content and also works well with WordPress plugins that are created to handle email routing, such as the various SMTP plugins.

By default wp_mail() sends email as plain text with the mime type of “text/plain” and you may have a need to send email in HTML format.

We can simply change the mime type to “text/html”  so that subsequent emails sent after adding a filter to “wp_mail_content_type” will change the mime header to “text/html” for all email going forward.

function te_wp_mail_html(){
    return "text/html";
}
add_filter( 'wp_mail_content_type','te_wp_mail_html' );

That’s it, now all email sent from WordPress will be sent as HTML email.

One important point to remember is that as mentioned previously WordPress by default sends emails in text format.

As such it happens to wrap its password reset link with <> symbols. So if you send emails with a text/html header, this password reset link will get converted to HTML and no longer be visible in the email, as a result you must set the headers back to text by removing the filter override after you send the email.

Lets look at a few examples how you may use the code in such instance.

Note: the following code snippets would be used in either a custom plugin or the functions.php file of your theme.

Example 1

We have a separate function “te_wp_mail_html” where we set the MIME type, and call that using the “wp_mail_content_type” filter before sending the email. Once the email has been sent with wp_mail(), we remove the function by calling remove_filter on “wp_mail_content_type“. I prefer this method as it allows more organization of the code and you can use “te_wp_mail_html” in other code blocks as well.

In the example below we assume some processing on a form submission and ‘some_event_action’ which maybe an action/filter available based on your form plugin, so please adapt the code accordingly.

function te_form_submission_process(){
    //Your submission processing

    //Add the filter before calling the wp_mail() function
    add_filter( 'wp_mail_content_type','te_wp_mail_html' );

    //Send the email with required parameters
    wp_mail( $to, $subject, $message, $headers, $attachments );

    //Remove the filter we added so that we dont affect other processes
    remove_filter( 'wp_mail_content_type','te_wp_mail_html' );
}
add_filter( 'some_event_action','te_form_submission_process' );


//Our override function to set the email MIME type to HTML
function te_wp_mail_html(){
    return "text/html";
}
​

Example 2

Instead of using a separate function as the previous example, we can set and unset the mime type directly in the processing function.

function te_form_submission_process(){
    //Your submission processing

    //Set the MIME type of wp_mail_content_type directly without external function
    add_filter('wp_mail_content_type', function() { return "text/html"; } );

    //Send the email with required parameters
    wp_mail( $to, $subject, $message, $headers, $attachments );

    //Set the MIME type of wp_mail_content_type directly without external function
    add_filter('wp_mail_content_type', function() { return "text/plain"; } );
}
add_filter( 'some_event_action','te_form_submission_process' );

Example 3

Set the header as part of the $header parameter array right in the wp_mail() function. This will only affect the current call to the function and all default WordPress functionality will remain the same.

function te_form_submission_process(){
    //Your submission processing

    wp_mail( $to, $subject, $message, array('Content-Type: text/html; charset=UTF-8'), $attachments );
}
add_filter( 'some_event_action','te_form_submission_process' );

WordPress: Moderate comments using regular expressions

7

While WordPress allows us to moderate and blacklist comments using two nifty text-areas within Settings->Discussion called “Comment Moderation” and “Comment Blacklist” you may need to add some extra functionality so that RegEx or Regular Expressions can also be used to directly approve, moderate, send to spam or blacklist comments.

Fortunately there is the “pre_comment_approved” filter which we can use for this purpose.

Lets setup our scenario, I want to add some moderation so that users don’t add URL’s in comments and I will make a quick check for domain names in the comment content.

Note: The code below would either go in your themes functions.php or a custom plugin.

In order to keep the example simple I am going to use a generic domain matching regex.

Example 1. Lets say we want to moderate the comments.

Here we set $approved to the integer 0(zero)

function te_check_comment($approved, $commentdata){
	if(preg_match('#\b((?=[a-z0-9-]{1,63}\.)[a-z0-9]+(-[a-z0-9]+)*\.)+[a-z]{2,63}\b#i',$commentdata["comment_content"])){
		$approved = 0;
	}
	return $approved;
}
add_action('pre_comment_approved', 'te_check_comment', 10, 2);

Example 2. Here we want to mark the comments as spam.

$approved is set to the string ‘spam’

function te_check_comment($approved, $commentdata){
	if(preg_match('#\b((?=[a-z0-9-]{1,63}\.)[a-z0-9]+(-[a-z0-9]+)*\.)+[a-z]{2,63}\b#i',$commentdata["comment_content"])){
		$approved = 'spam';
	}
	return $approved;
}
add_action('pre_comment_approved', 'te_check_comment', 10, 2);

Example 3. Here we want to send the comments directly to trash.

$approved is set to the string ‘trash’

function te_check_comment($approved, $commentdata){
	if(preg_match('#\b((?=[a-z0-9-]{1,63}\.)[a-z0-9]+(-[a-z0-9]+)*\.)+[a-z]{2,63}\b#i',$commentdata["comment_content"])){
		$approved = 'trash';
	}
	return $approved;
}
add_action('pre_comment_approved', 'te_check_comment', 10, 2);

Example 4. We want to bypass everything and Approve the comment if it matches our string.

$approved to the integer 1(one)

function te_check_comment($approved, $commentdata){
	if(preg_match('#\b((?=[a-z0-9-]{1,63}\.)[a-z0-9]+(-[a-z0-9]+)*\.)+[a-z]{2,63}\b#i',$commentdata["comment_content"])){
		$approved = 1;
	}
	return $approved;
}
add_action('pre_comment_approved', 'te_check_comment', 10, 2);

Keep in mind that all the comments submitted will be saved in the WordPress comments table with the appropriate approved status.

Installing Gearman Module for PHP7 on Ubuntu

1

If you use Gearman in your PHP projects for parallel processing, and just upgraded your PHP version to PHP7 you will quickly realize that none of your workers are well working anymore.

Or if you are setting up a new Ubuntu server with PHP7 you will soon realize that there is currently no upgraded package to quickly get gearman setup.

Well fear not, in this quick guide I will show you how to make the required updates so you can get up and running real quick.

In order to make sure we have a seamless installation with a fresh server I will list the common commands, but you can start at a different point if you think you already have certain components installed.

All commands should be run as root user or with sudo.

1. Install and update the Gearman PPA

Lets install the software-properties-common package and add the gearmandevelopers ppa to our repository and make sure it is updated.

sudo apt-get install software-properties-common
sudo add-apt-repository ppa:gearman-developers/ppa
sudo apt-get update

2. Install Gearman Job Server and some other required components and tools

We will be installing the gearmanjobserver and libgearmandev so that we can have the actual gearman server installed aswell as the libraries to compile the PHP module. For this we install PHP7 dev libary aswell as a few tools we will need. Once these are installed lets go ahead and do an upgrade.

sudo apt-get install gearman-job-server libgearman-dev php7.0-dev php-pear wget unzip re2c
sudo apt-get upgrade

3. Download, compile the gearman pecl module and add to php.ini

cd /tmp/
sudo wget https://github.com/wcgallego/pecl-gearman/archive/master.zip
unzip master.zip
cd pecl-gearman-master
sudo phpize
./configure
sudo make
sudo make install
echo "extension=gearman.so" | sudo tee /etc/php/7.0/mods-available/gearman.ini
sudo phpenmod -v ALL -s ALL gearman

4. Restart webserver or PHP FPM

sudo service php7.0-fpm restart
sudo service apache2 restart

If you are running a different version of PHP make sure you make the appropriate changes to the commands or directories mentioned above. ie “/etc/php/7.0/” to “/etc/php/7.1/” etc.

jpegoptim utility to optimize/compress jpeg images usage

0
jpegoptim v1.4.4  Copyright (c) 1996-2016, Timo Kokkonen
Usage: jpegoptim [options] <filenames>

  -d<path>, --dest=<path>
                    specify alternative destination directory for
                    optimized files (default is to overwrite originals)
  -f, --force       force optimization
  -h, --help        display this help and exit
  -m<quality>, --max=<quality>
                    set maximum image quality factor (disables lossless
                    optimization mode, which is by default on)
                    Valid quality values: 0 - 100
  -n, --noaction    don't really optimize files, just print results
  -S<size>, --size=<size>
                    Try to optimize file to given size (disables lossless
                    optimization mode). Target size is specified either in
                    kilo bytes (1 - n) or as percentage (1% - 99%)
  -T<threshold>, --threshold=<threshold>
                    keep old file if the gain is below a threshold (%)
  -b, --csv         print progress info in CSV format
  -o, --overwrite   overwrite target file even if it exists (meaningful
                    only when used with -d, --dest option)
  -p, --preserve    preserve file timestamps
  -P, --preserve-perms
                    preserve original file permissions by overwriting it
  -q, --quiet       quiet mode
  -t, --totals      print totals after processing all files
  -v, --verbose     enable verbose mode (positively chatty)
  -V, --version     print program version

  -s, --strip-all   strip all markers from output file
  --strip-none      do not strip any markers
  --strip-com       strip Comment markers from output file
  --strip-exif      strip Exif markers from output file
  --strip-iptc      strip IPTC/Photoshop (APP13) markers from output file
  --strip-icc       strip ICC profile markers from output file
  --strip-xmp       strip XMP markers markers from output file

  --all-normal      force all output files to be non-progressive
  --all-progressive force all output files to be progressive
  --stdout          send output to standard output (instead of a file)
  --stdin           read input from standard input (instead of a file)

JavaScript: Force page position to top of page on browser refresh

0

If you had an instance where you wanted the site visitor to see your pages starting at the top, these quick snippets will do just that for you.

This is executed when the user leaves the page, which could be a page refresh or even clicking on a link to go to another page on the site.

Since the page would scroll to the top before you leave the page there maybe slight jerk that could be noticed.

Vanilla Javascript Solution:

The .scrollTo function accepts two parameters which are the X and Y Coordinates. Providing (0, 0) will refer to the pixel coordinate displayed in the upper left corner of the browser.

window.onbeforeunload = function () { 
   window.scrollTo(0, 0);
}

jQuery Solution:

$(document).ready(function(){
   $(this).scrollTop(0);
});